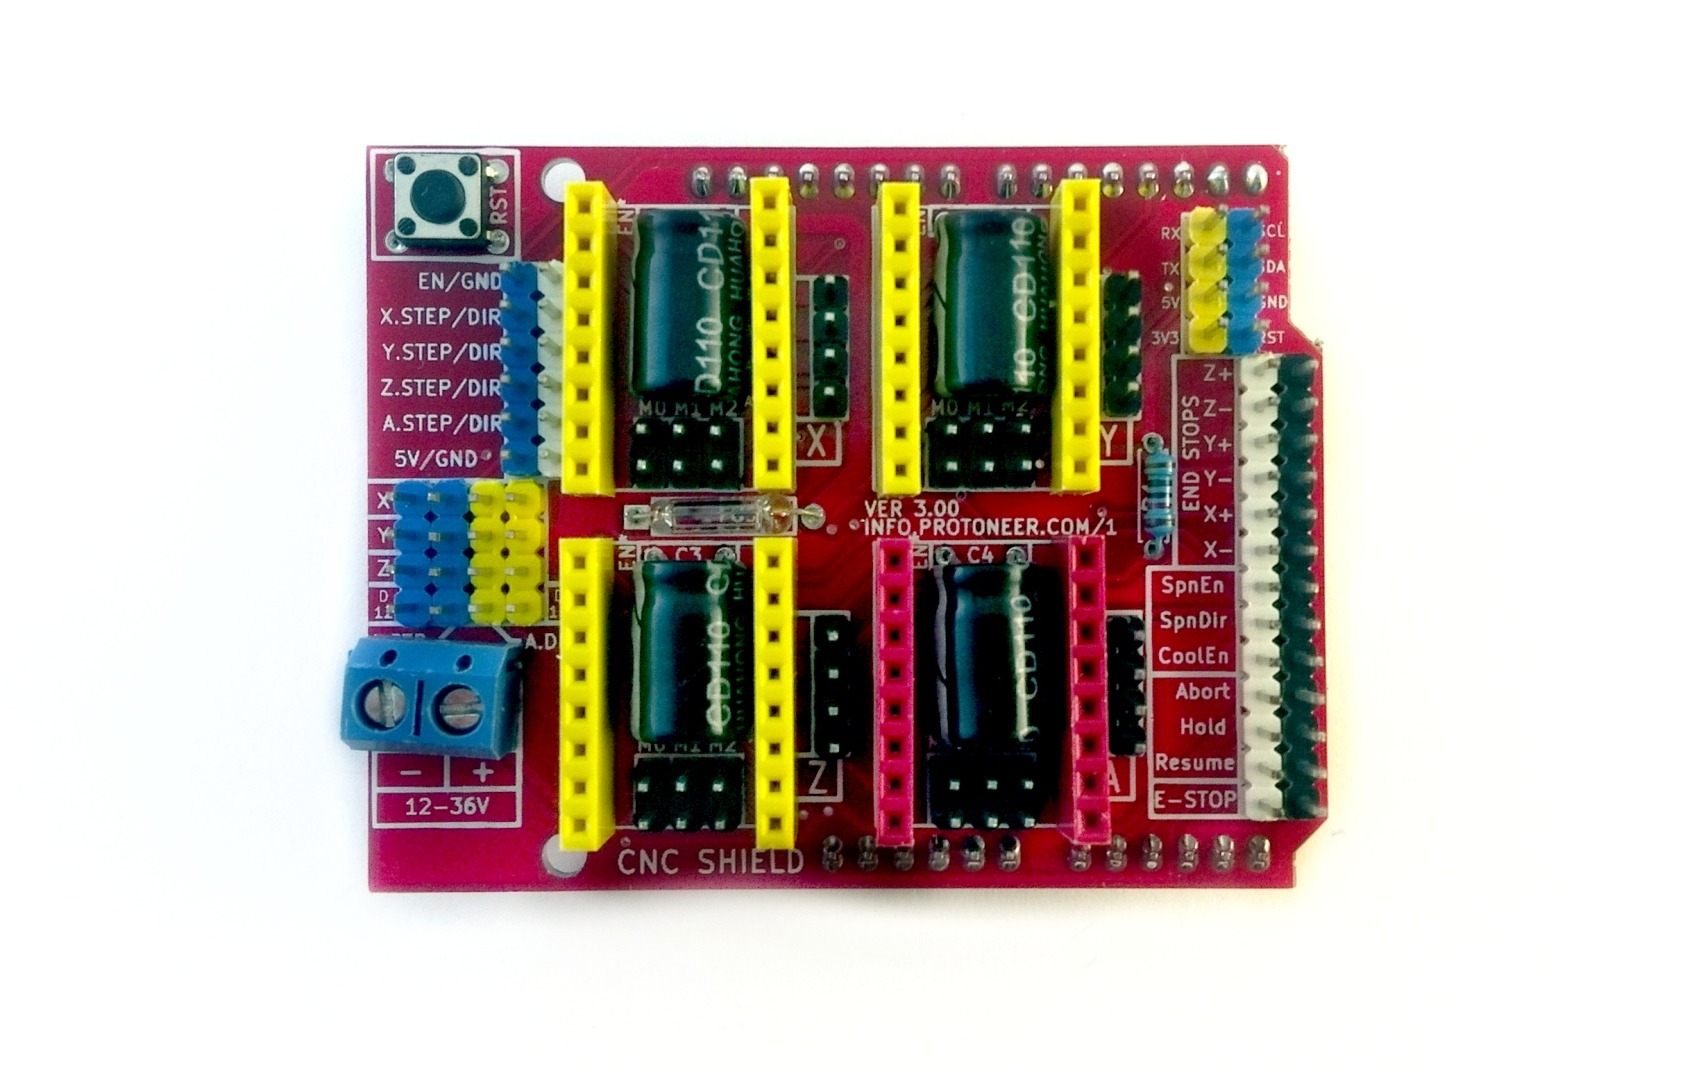
Arduino CNC shield version 3.0 with GRBL v0.9
My experience with Arduino CNC shield was a bit frustrating at the start. This article is about version v3.0 CNC shield. I didn’t know anything about this shield, GRBL software and how G-code is sent to CNC machine.
So I was pretty unsure about everything I was doing. I tested GRBL software with only CNC shield + Arduino, motors, and drives. A good start would be to buy the whole kit where everything essential for small desktop CNC is included (electronics wise). Find them on Amazon.com or Amazon.co.uk.
Original manual is pretty massive to start with and there seemed to be no 5-minute setup guide. But for the first-time test, I am not in the mood to read all that. I want to plugin everything and see things moving. And then make my progress through settings afterward. Be sure to read original Arduino CNC shield article also. Here I share my experience and problems occurred during the first tests.
- I am using Ubuntu Linux with KDE desktop, but I suppose this works universally.
- You even don’t need to have CNC shield to go through this article- minimum requirement is to have Arduino UNO development board (or possibly some other Arduino board).
Are you a beginner and don’t even know how to run stepper motors? You have to check out my detailed overview post on running stepper motor. If you have the machine ready- you should totally test out the online G-code tool I created to generate code for a simple customized hold-down clamp.
Getting GRBL code on Arduino
I downloaded latest (on time of writing this article it was v0.9i version) source from “github.com/grbl/grbl” by downloading using “Download ZIP” button on the top-right. So in future, it might download some newer version which maybe not be the same version I was using when writing this article.
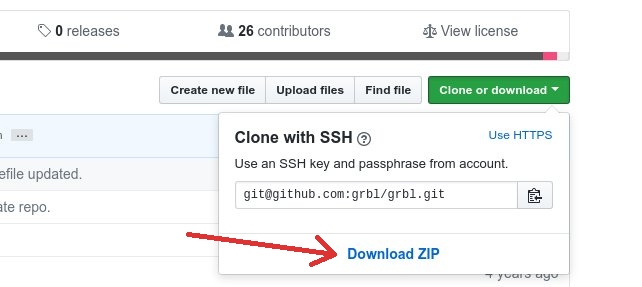
How to download source code by zip file from Github.com
If you want to use the exact same code version that I used in this article, you can download it here. But I suggest using the latest, since it probably will work also. Then you have to add it as a library. After that, you can import GRBL library to your source. You can read more about compiling here.
First problem
After importing I was not able to upload/flash it on Arduino on the first try. A error raised: “./sketchbook/libraries/grbl/nuts_bolts.h:73:15: error: ‘uint32_t’ was not declared in this scope“. By adding #include <stdint.h> before other includes removed this problem. Now I think I had just an old Arduino version or something.
Note that, there is no need for additional code. Only importing and you are done. Just upload it to your Arduino UNO board. Before GRBL v0.9 there was no direct upload option (If I remember correctly). Anyway – my code looked like this:
#include <stdint.h>
#include <nuts_bolts.h>
#include <eeprom.h>
#include <system.h>
#include <motion_control.h>
#include <config.h>
#include <serial.h>
#include <report.h>
#include <spindle_control.h>
#include <stepper.h>
#include <print.h>
#include <gcode.h>
#include <settings.h>
#include <coolant_control.h>
#include <cpu_map.h>
#include <grbl.h>
#include <protocol.h>
#include <probe.h>
#include <planner.h>
#include <limits.h>
#include <defaults.h>
Connecting to GRBL via Arduino serial monitor
Now everything should be ready to go. I opened serial monitor via Tools menu in Android IDE. Note that since GRBL version 0.9 you have to set the baud rate to 115200. Otherwise, you only see some garbled characters echoed to serial monitor window.
Everything seemed OK to this point. In terminal following welcome message popped up: Grbl 0.9i [‘$’ for help]. That means everything is OK and I was connected. But it can’t go so smooth isn’t? I stepped into next issue. I tried to send some commands, but nothing happened. Except – “?” command yielded results similar to this: <Idle,MPos:0.0000,0.0000,0.0000,WPos:0.0000,0.0000,0.0000,Buf:0,RX:0>
After wrestling with this problem sometime I finally learned why this was happening. One must set “No line ending” to “Carriage return” in Arduino Serial monitor (bottom – right). Actually, it’s said in GRBL Readme too, but somehow I had missed it. I was excited. Finally, I got something back. It was “$$” command which returns current settings used by GRBL software.
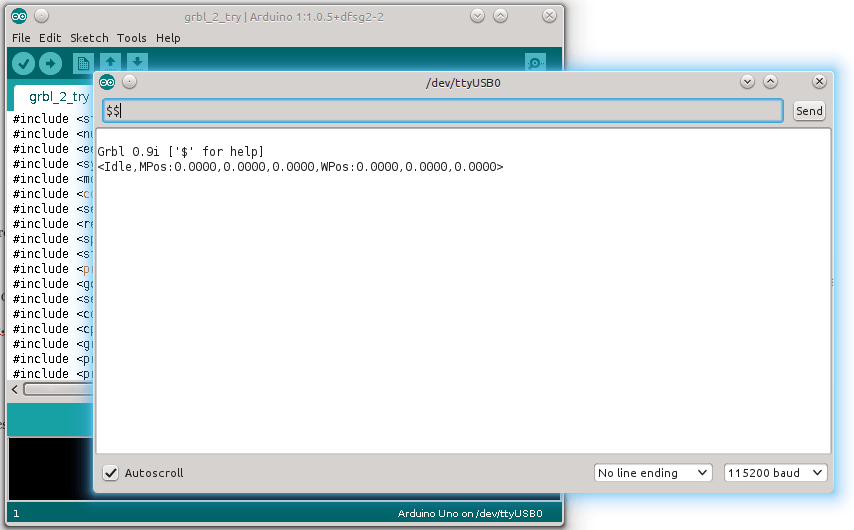
GRBL v0.9i serial monitor welcome message
First steps and sending g-code to GRBL?
I would test real movements without hooking motors up into your CNC machine at first. To get hang of this before ripping your nice machine apart. Now for testing, you could insert g-code command such as “G0 X2.0 Y2.0 Z2.0” into Serial monitor terminal – it should move all motors a bit. (Look video at the end) Even if you have no shield, drives or motors hooked up- terminal should report back with “ok”. You are done!
I had some unanswered questions also. Do I have to add limit switches before motors will move? What about the homing cycle? Turned out that I can just configure that there are no limit switches. Also, a homing cycle is not needed. Nothing at all. Everything runs smoothly without configuring beforehand. See config lines $20, $21 and $22. Zeroes mean that these features are turned off by default config.
I somehow had problems with default settings at first. Motors did not move. At first, only one step was done and no “ok” was echoed back. Settings were different than in this article. I think I messed up something earlier somehow. Anyway – probably acceleration or maximum rate of movement was with wrong settings- so command executed too slow and echo back no “ok”.
Default GRBL v0.9 settings with Arduino CNC shield version 3.0
Default settings Arduino had were following. I don’t know – are these same for all installations or not. Anyway, here is my printout of settings for reference.
$0=10 (step pulse, usec)
$1=25 (step idle delay, msec)
$2=0 (step port invert mask:00000000)
$3=0 (dir port invert mask:00000000)
$4=0 (step enable invert, bool)
$5=0 (limit pins invert, bool)
$6=0 (probe pin invert, bool)
$10=3 (status report mask:00000011)
$11=0.020 (junction deviation, mm)
$12=0.002 (arc tolerance, mm)
$13=0 (report inches, bool)
$20=0 (soft limits, bool)
$21=0 (hard limits, bool)
$22=0 (homing cycle, bool)
$23=0 (homing dir invert mask:00000000)
$24=25.000 (homing feed, mm/min)
$25=500.000 (homing seek, mm/min)
$26=250 (homing debounce, msec)
$27=1.000 (homing pull-off, mm)
$100=250.000 (x, step/mm)
$101=250.000 (y, step/mm)
$102=250.000 (z, step/mm)
$110=500.000 (x max rate, mm/min)
$111=500.000 (y max rate, mm/min)
$112=500.000 (z max rate, mm/min)
$120=10.000 (x accel, mm/sec^2)
$121=10.000 (y accel, mm/sec^2)
$122=10.000 (z accel, mm/sec^2)
$130=200.000 (x max travel, mm)
$131=200.000 (y max travel, mm)
$132=200.000 (z max travel, mm)
Video with default settings
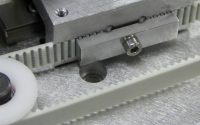
Here is a quick video of all 3 axes moving with default settings and no micro stepping applied. Just running different axes forward and backward separately and in the end also back to zero simultaneously. Wantai 42BYGHW609 stepper motors were in use.

what´s wantai 42BYGHW609 cable wiring?
red/blue/ green/black = 2B/2A/1A/1B?
You have pairs from motor right. Paired wires are for these motors red/blue and green/black.
But connections to driver seem to be messed up right now. In your example- wires and driver should be connected as following for example (in my projects is connected following way).
red/blue AND green/black = 1B/2B AND 1A/2A
Keep in mind that motor pair must be connected to a pair on driver (pairs are A1&A2 and B1&B2). Motor wires can be connected either way as long as its within same pair- if I remember correctly. Only motor spins different directions when trying others.
But my example above is from actual setup and should work.
Dear sir
In my case axis X Y Z moves in manual OK
By sending the .nc file machine starts but in the middle of the program machine stops for few sec while from the grbl program is sending continue
After few sec machine starts again stop for few sec
Don’t get problem resolved
Please sugess
Thanks
.Bipin Panchal
Maybe program sends some commands that GRBL does not recognize? Are all .nc files acting like that?
Go check their contents against supported commands. Seach List of Supported G-Codes in Grbl v1.1 on their readme : https://github.com/gnea/grbl
thanks for sharing Janar! It´s was usefull!
Thanks for sharing.
I read you mount grbl 0.9 on a cnc shield v3.0,
Can you use the PWM signal in any way?
I don’t understand motive of your question. Why you need PWM signal for Arduino CNC shield? Motors need pulses so it is most suitable use.
grazie per la rapida risposta. ho scritto male la domanda. vorrei montare come spindle, brushless motor or laser diode they news pwm to work, but cNc shield v3.0 is not compatible with grbl 0.9 infact
For Grbl v0.9 with variable spindle PWM ENABLED: (NOTE: The Z-limit and the spindle enable pin are swapped, because we had to access the hardware PWM on D11 for variable spindle PWM output to work.)
Can you help me?
thanks for the quick reply. I wrote the wrong question. I would like to mount as a spindle, brushless motor or laser diode news they pwm to work, but CNC shield v3.0 is not compatible with grbl 0.9 infact on product site They write:
For Grbl v0.9 with variable spindle PWM ENABLED: (NOTE: The Z-limit and the spindle enable pin are swapped, because we had to access the hardware PWM on D11 for variable spindle PWM output to work.)
Can you help me?
I Have a V3 Protoneer CNC shield, Arduino Mega2650, Raspberry Pi (Raspian Jessie), A4988 Stepper driver, 4 lead stepper motor that steps nicely with code by Tom Igoe for Arduino with L293D driver circuit and a 300ma supply set to 4.5 VDC. The same motor does not respond to Grbl, the CNC shield, and the A4988 driver even with the supply set to 9v.
Using an old Logic probe (LED hi, pulse, lo) the shield x-step and x-dir pins appeared to be floating. Removing the shield and probing Mega2650 pins 2-8 all appeared to be floating. Reloading Tom Igoe’s code the pins 8 & 9 stepped through hi, pulse, and low as the program executed. Modifying his code to use pins 2,3 and again 5,6 indicates that the step x, step y, dir x, dir y and step en/dis pins all can work with Tom’s code.
Grbl 0.8c responds as expected to commands of the form g1 x2 return ? return entered to the IDE serial monitor. I was initially puzzled by behavior of the ? command but it acts as intended and documented. I discovered g91 permits relative motion and g90 switches back to absolute. Grbl appears to work as viewed through the serial port but I see no drive when the I/O pins are probed. Even though I can see the same pins respond to non grbl code.
Is there some applicable difference between the UNO and the Mega? Is pin 8 Stepper Enable/Disable an input? Does the compiler glitch with the 2650? I tried to load 0.9j without success even from Ubuntu on my netbook. The 1.0.5 IDE appears to be the latest ARM version for the Pi, should it support grbl?
Obviously I am missing something. Any suggestions will be much appreciated.
Thanks,
Ezy7
Alex,
Please see in GRBL source file config.h:
// Enables variable spindle output voltage for different RPM values. On the Arduino Uno, the spindle
// enable pin will output 5V for maximum RPM with 256 intermediate levels and 0V when disabled.
// NOTE: IMPORTANT for Arduino Unos! When enabled, the Z-limit pin D11 and spindle enable pin D12 switch!
// The hardware PWM output on pin D11 is required for variable spindle output voltages.
#define VARIABLE_SPINDLE // Default enabled. Comment to disable.
Fol older shield boards like mine (Ver. 3.00), just coment this line and the pin layout wil be not switched:
// #define VARIABLE_SPINDLE // Default enabled. Comment to disable.
Just compile and upload in the Arduino IDE with grblUpload.
Daniel.
Just a question the red pins on the cnc shield what would that be used for ?
For 4-th motor. First 3 are for X,Y and Z. How it can be used- I don’t know.
Hi Janar, first of all thanks for sharing your experience. The fourth motor driver can be used for those projects which have two identical motors driving the same axis (duplication), or for a fourth DOF (e.g. inclination of Z axis) in a more sophisticated milling machine.
Hello, I want to know if I can move steppers manually (via Arduino code) with the CNC Shield and without grbl, is for a personal proyect, and the L298N module doesn´t work fine with steppers (a lot of vibrations), the idea is create a sketch with all steps the motors will do, and run it, using the CNC Shield, I try with the A4988 drivers with Arduino code, but doesn´t work properly, and I don´t know why, all connections are ok, voltage and amps too, please help me!! Thanks in advance.
Hi.
Yes- it’s possible to use shield without GRBL software. Checkout for example: https://github.com/grbl/grbl/wiki/Connecting-Grbl There you can see, what Arduino pin to send step/direction pulses when using CNC shield. For example if you have motor connected up into X axis in shield. You can use Arduino pins 5 (direction) and 2 (pulse) for running that motor. Also pin 8 should be set to HIGH/LOW (enable).
Shield makes all connections and installing drivers easier. But it’s possible to use GRBL software without shield too by making all connections yourself.
What you mean by “not properly”- can’t move at all or not moving correctly(skipping, vibrating, changing directions randomly etc).
Hello and thanks for your fast answer, the stepper is skipping and vibrating, the directions are correct.
Ok- can’t recommend anything at moment about debugging this issue. This could be issue with bad connections to motor, too low / high current setting (trimmer pot on drive) and many other variables. Also you haven’t mentioned what power supply and motors you are using etc.
Hello, I have Nema17 steppers, 12v 5A power supply, voltage in pot 1,5v+-, my multimeter don´t want to read amps, connections are ok, coil by coil, and the code I used is this:
const int dirPin = 8;
const int stepPin = 9;
const int steps = 200;
int stepDelay;
void setup() {
// Marcar los pines como salida
pinMode(dirPin, OUTPUT);
pinMode(stepPin, OUTPUT);
}
void loop() {
//Activar una direccion y fijar la velocidad con stepDelay
digitalWrite(dirPin, HIGH);
stepDelay = 250;
// Giramos 200 pulsos para hacer una vuelta completa
for (int x = 0; x < 200; x++) {
digitalWrite(stepPin, HIGH);
delayMicroseconds(stepDelay);
digitalWrite(stepPin, LOW);
delayMicroseconds(stepDelay);
}
delay(1000);
//Cambiamos la direccion y aumentamos la velocidad
digitalWrite(dirPin, LOW);
stepDelay = 150;
// Giramos 400 pulsos para hacer dos vueltas completas
for (int x = 0; x < 400; x++) {
digitalWrite(stepPin, HIGH);
delayMicroseconds(stepDelay);
digitalWrite(stepPin, LOW);
delayMicroseconds(stepDelay);
}
delay(1000);
}
And the stepper turn a bit instead a full rotation, and it have vibration and sound, with another example, only turn a bit more, more vibration, I try with 3 different drivers, with the same results. Thanks for your time.
Maybe you have to play around with delay’s. Some problems can happen if Arduino sends steps too fast and motor can’t react as fast . Just a little idea.
I used Arduino cnc shield v3 and drv8825 driver and grbl 0.8
I have a problem with direction
the motor move in same direction for both X+ and X- (clockwise)
how can I fix it
I want to have move reverse when I click on X-
Not sure what can cause this issue. Maybe something with CNC software you are using? Test with other driver / other axis maybe? Anyway not familiar with this problem and can’t suggest anything based on this info.
Hello, finally I have got a piece of code that works!
#define EN 8
#define STEP 10 // Pin STEP
#define DIR 12 // Pin DIR
int Count = 0; /* Counter to count number of steps made */
boolean Direction = LOW; /* Rotational direction of stepper motors */
void setup() {
pinMode(EN, OUTPUT);
pinMode(STEP, OUTPUT);
pinMode(DIR, OUTPUT);
digitalWrite(EN, LOW);
}
void loop() {
Count++;
if (Count >= 3200)
{
Direction = !Direction;
digitalWrite(DIR, Direction);
Count = 0;
}
digitalWrite(STEP, HIGH);
delay(1);
digitalWrite(STEP, LOW);
delay(1);
}
It works with an alone A4988 driver, the MS1, MS2, and MS3 pins must be in High (1/16 step), if not it doesn´t work, the point is the speed, I need some speed and I don´t know how it works, I need some help with this, thanks in advance for your time!
Hello, I found the answer to the speed, only must change in delay(1), delayMicroseconds(139); for a 120 RPM speed, thanks for your help.
Regards,
Juan Tavio.
Great!
Thank you.
i’ve a problem with my cnc shield, grbl has uploaded to arduino and i use 3 motor vexta (5 pins) how to generate my cnc shield (4 pins) and then rotation motors is’nt maximal/not actual from firmware grbl, how to fix it ?
i’ve tried to wire the pin but the motor not to be rotate.
Hi
I have a problem maybe you can help me, with a v.3.0 shield all 3 axes work ok but if I clone one of them it only spins in one direction, already tried different grbl versions all have the same problem. Any idea? Thanks
No good idea. Have you tried to clone from other axes and maybe switch drive/motor etc also? Basically done basic debugging by testing each part individually.
Hi, I have a problem with my cnc plotter. I installed grbl 0.9i and I have cnc shild arduino v3.0. I use the Universal Gcode Platform software. When I pass the Jog controller mode and press the X + button, the pen slides diagonally. The X + and Y axis work. I changed the step-thistles but it did not do anything. Stepper motors are connected well. What could be wrong?
Strange that it runs both motors same time (that’s why diagonal movement). Is it possible that you have somehow cloned your axis? It’s impossible much else to tell and this situation seems not familiar to me. Is that diagonal run only first time you pressed jog? If yes – you might have to zero coordinates before – It should be somewhere in the workflow commands.
Hi i followed every step of yours and i am using nema17 stepper with 12v 5a smps. In my pen plotter x stepper is moving but y stepper is not moving but the spindle is tight