27 Jul 2018

How to run two CNC shields (other one as clone) with one Arduino UNO
I learned a nice thing about Arduino CNC shield today. I have a project coming up where I need 3 axes. On each axis, there will be 2 motors (cloned, running in sync). That means I need a total of 6 motors and drives, but CNC shield only supports 4 drives (axes). So I needed two boards somehow to work together with one Arduino. The second one needs to run as a clone/slave. So it would be possible to run a cloned motor for each axis.
I was afraid that I must create some hackish middle layer to route connections to both shields. But actually, there was no soldering or hacking needed. The solution was already there like it’s meant for that.
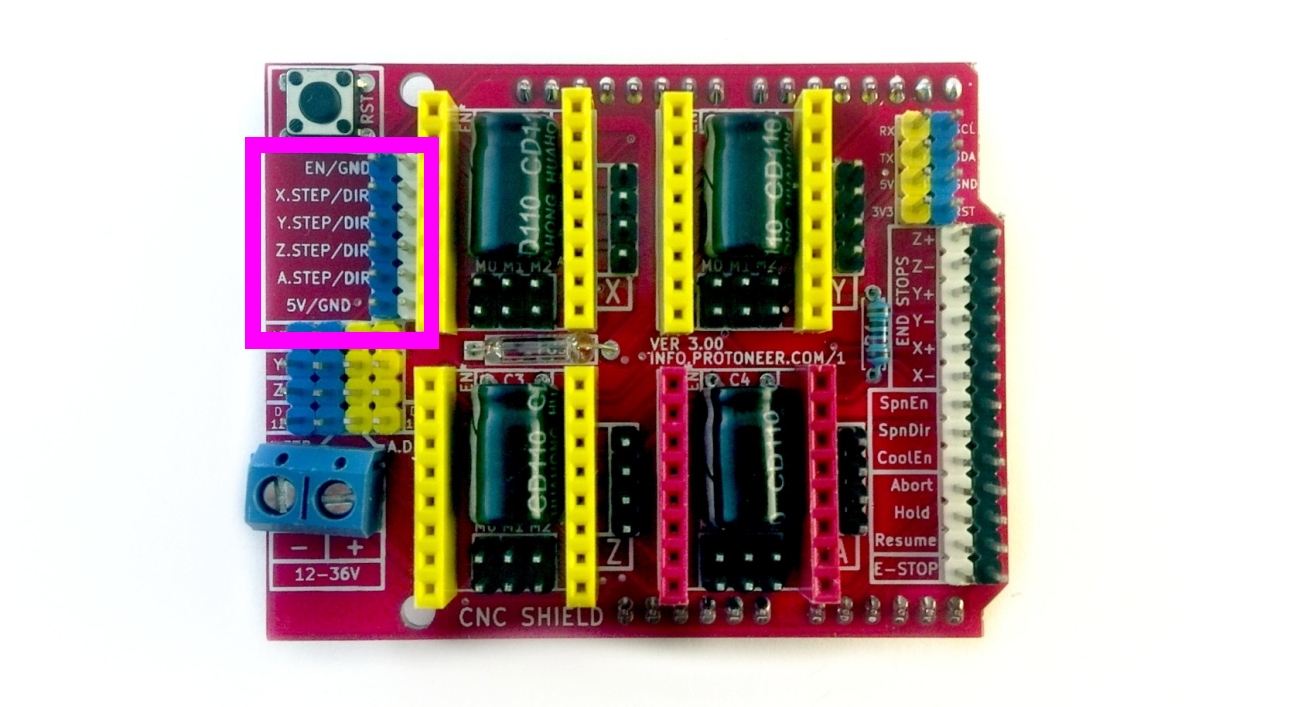
Arduino CNC shield pinout for cloning whole board
Arduino CNC shield has very convenient pin-outs on its board. Not only for cloning 4th axis but also to clone the whole board. Not sure is it especially for this but it worked for my application. You only need to connect (highlighted) pins from the primary board to the second one and it’s cloned.
How does this work?
What happens is that we send the same step and direction commands to other board like on the original one. The pins on top of a shield are just passing through signals. The shield does not care that it’s not sitting top of Arduino directly. So it should be possible stack even more shields in such way.
Since other board is not attached to an Arduino we need 3 extra connections. Connect the same pins from primary shield to the same pins on the secondary shield and it’s done. Minimum connections are:
- Enable pin (so drives can be activated by software)
- +5V
- GND
That’s it. Now you can clone needed axes on other board by connecting corresponding pins from one board to other. And of course, don’t forget to power the cloned board too. Look photo of the example used in this article. Here I have cloned only Z-axis to the second board.
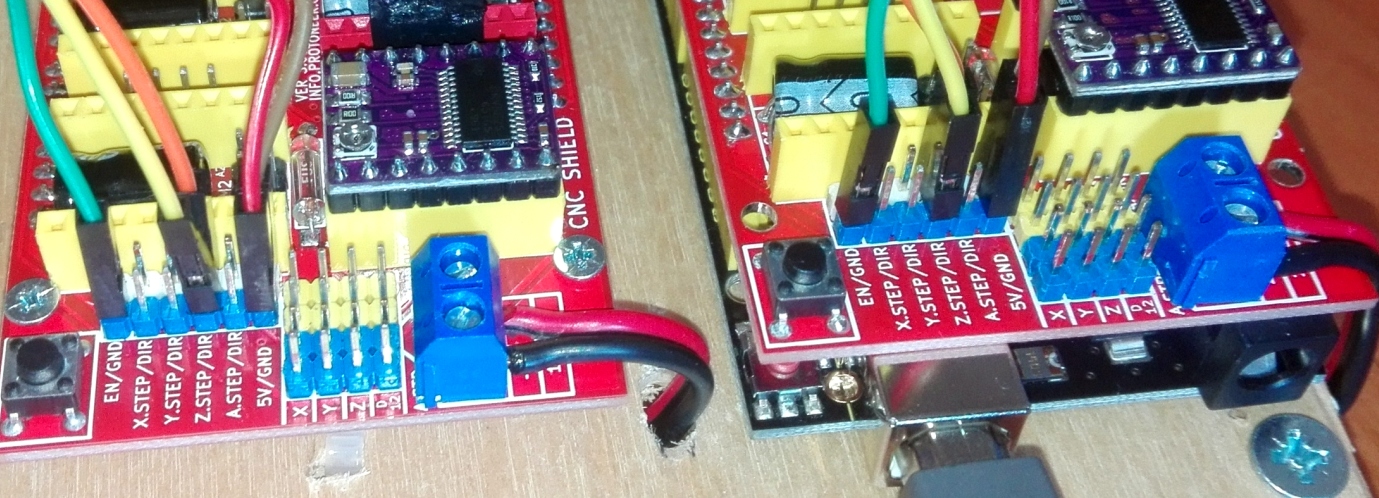
A closer look at example setup
Go check out the quick video on Youtube with this example running.

Great post. Thanks for that.
Do you know if you can use the extra end stopsensors on the slave board, so you can use an endstop switch for each of the 2 motors on an axis? Autosquaring my cnc-mill would be much easier then.
Otherwise I think you don’t need the slave board because you can just put 2 motors in series together.
In Series? why not in parallel?
I just realized that there are 6 endstop sensors on 1 board. 😉
Hi, I have a question
The endstops on one a single CNC shield board are for each side of the axis travel (position 0 and max)
But in case of you clone the Y axis and need 1 end stop at position Zero for each motors. when the gantry is a little out of square, one one side will reach the endstop before the other.
How to allow the second motor to reach its own endstop pour get all thing square ?
Thanks
In this project that was actually question also, but didn’t think any good solution other than … overpower motors and make sure they won’t lose any steps. Also, make things square to start with. Endstop would be between them on axis, not near both motors.
But yeah- if one motor would reach limit sooner it would start to break things since motors are cloned. I have no good solution to propose for this. It looks like it needs some custom firmware + cloning like in this example won’t work for you. Since you would need to control both motors separately.
On my, an other, CNC V3 boards it says a couple of places +5V and GND pins but when I measure the voltage it say about 3.3 volts
I inputting 5V to an Arduino Uno and 12 Volts to the CNC V3 Shield: what am I doing wrong. It works as expected; (steeper moves, etc), but I was hoping to drive a 5 Volt LED off these to indicate the power is on
Not sure how to overcome this and why it is 3.3V instead of 5V when noted 5V on board.